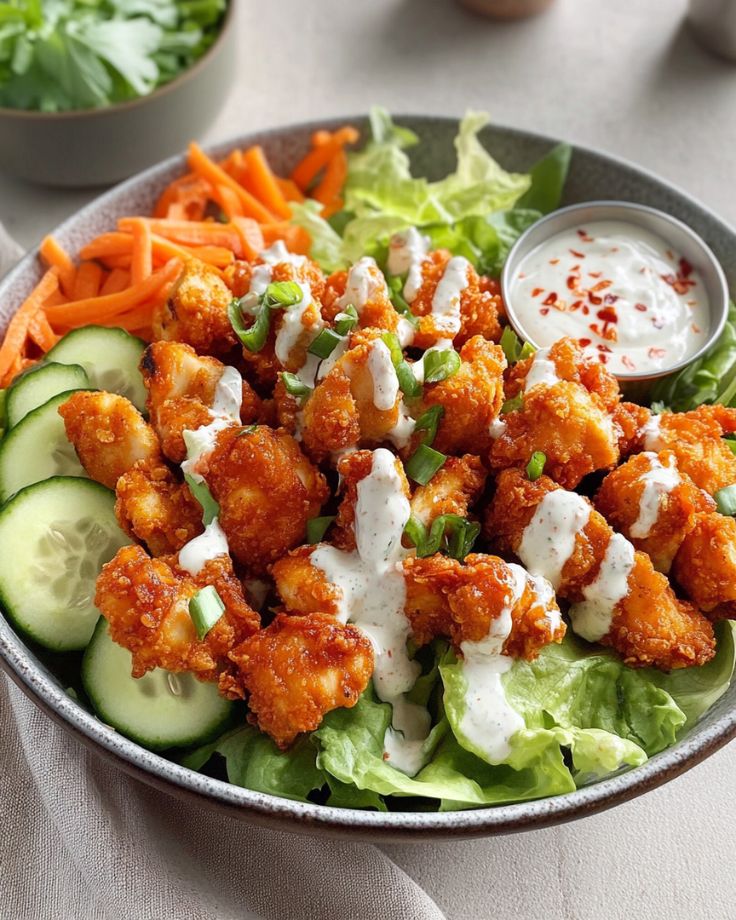
Author

Designer

Browsing

Smothered Green Chile Chicken Burritos 

Crispy, cheesy, and packed with bold flavors, these Smothered Green Chile Chicken Burritos are a game-changer!

Baked until golden and crunchy, then drenched in a rich, creamy homemade green chile sauce, every bite is pure comfort.

This recipe is easy, meal-prep friendly, and freezer-friendly, making it perfect for busy nights when you want something delicious without the hassle.

One taste, and you’ll be hooked—just like your favorite restaurant burrito, but even better at home!

For the Chicken Filling

  • Chicken – Use cooked, shredded, or chopped chicken for a quick and easy filling. Leftover rotisserie chicken works great too!
  • Salsa – Adds moisture and flavor. Use your favorite kind—mild, medium, or hot!
  • Ground Cumin – Brings a warm, earthy depth to the filling.
  • Dried Oregano – Adds a subtle, aromatic touch.
  • Cheddar Cheese – Melts into the filling, making it creamy and extra delicious.
  • Green Onions – Adds a bit of freshness and crunch.
  • Flour Tortillas – Large tortillas work best for wrapping everything up neatly.
  • Olive Oil – Used to brush the burritos before baking for a crispy finish.

For the Green Chile Sauce

  • Butter – The base for a rich, velvety sauce.
  • All-Purpose Flour – Helps thicken the sauce to the perfect consistency.
  • Garlic – Just one clove adds a ton of flavor!
  • Chicken Broth – Low-sodium is best so you can control the salt.
  • Ground Cumin – Enhances the depth of flavor in the sauce.
  • Dried Oregano – Adds a subtle herbaceous note.
  • Salt & Black Pepper – To taste, for seasoning balance.
  • Diced Green Chilies – The key to that bold, zesty flavor! Use mild or hot, depending on your preference.
  • Cheddar Cheese – Melts into the sauce, making it extra creamy.
  • Sour Cream – Adds a smooth, tangy finish to the sauce.

Smothered Green Chile Chicken Burritos

Prep Time 10 minutes
Cook Time 40 minutes
Total Time 50 minutes
Servings 6 burritos
Calories 445
These delicious burritos are filled with shredded chicken, cheese, and spices, baked until crispy, and then smothered in a flavorful homemade green chile sauce.

Ingredients

For the Chicken Filling:

  • 3 cups cooked chicken, shredded or chopped
  • cups  salsa (your favorite kind)
  • tsp ground cumin
  • ½ tsp dried oregano, crushed
  • cups shredded cheddar cheese
  • 2 green onions, chopped
  • 6  large flour tortillas
  • Olive oil (for brushing or spraying)

For the Green Chile Sauce:

  • 3 tsp butter
  • 3 tsp all-purpose flour
  • 1 clove garlic, minced
  • 2 cups low-sodium chicken broth
  • ½ tsp cumin
  • ½ tsp dried oregano, crushed
  • Salt and freshly ground black pepper, to taste
  • 4 ounces diced mild green chilies
  • cup shredded cheddar cheese
  • ½ cup sour cream

Instructions 

1. Prepare the Burritos:

  • Preheat the oven to 400°F (200°C). Line a baking sheet with foil or parchment paper.
  • In a bowl, mix together the chicken, salsa, cumin, oregano, cheese, and green onions.
  • Place about ½ cup of the mixture in the center of each tortilla.
  • Fold in the sides and roll up tightly. Place seam-side down on the prepared baking sheet.
  • Lightly brush with olive oil or spray with cooking spray.
  • Bake for 20-25 minutes, or until golden brown and crispy.

2. Make the Green Chile Sauce:

  • In a medium saucepan, melt butter over medium heat.
  • Once melted, whisk in flour and stir constantly for about 3 minutes until bubbly.
  • Add minced garlic and cook for 30 seconds.
  • Gradually whisk in the chicken broth. Stir in cumin, oregano, salt, and black pepper.
  • Continue stirring until thickened, about 2-3 minutes.
  • Remove from heat and stir in green chilies, shredded cheese, and sour cream. Adjust seasoning if needed.

3. Broil & Serve:

  • Remove the burritos from the oven and switch the oven to HIGH broil.
  • Spoon the green chile sauce over each burrito and sprinkle with additional shredded cheese.
  • Broil for 2-3 minutes until the cheese is melted and bubbly.
  • Serve hot with Authentic Mexican Rice or your favorite sides.

Notes

Make-Ahead & Freezing Instructions:

  • Make Ahead: The chicken filling and green chile sauce can be prepared 1-2 days in advance. Store separately in the fridge until ready to use.
  • Freezing: Assemble the burritos, then freeze them in a ziplock bag. Prepare the sauce without adding sour cream and freeze separately.
    • To bake from frozen: Place burritos on a lined baking sheet, cover with foil, and bake at 350°F for 40 minutes. Uncover and bake for an additional 15-20 minutes until crispy.
    • Reheat the frozen sauce in a saucepan, stir in sour cream, and serve over the burritos.
Calories: 445kcal
Course: Main Course
Cuisine: American, Mexican
Keyword: Chicken Burritos

  1. Can I make anything ahead of time?

Yes! Both the chicken filling and green chile sauce can be made 1-2 days in advance and stored in the fridge. Just reheat when you’re ready to assemble the burritos!

  1. Can I freeze these burritos?

Absolutely! Assemble the burritos, wrap them tightly, and freeze. Freeze the sauce separately (before adding the sour cream). When ready to eat, bake from frozen at 350°F (175°C) for 40 minutes, then uncover and bake for another 15-20 minutes. Warm the sauce, stir in sour cream, and serve!

  1. What if I don’t have green chilies?

No worries! You can swap them with roasted poblano peppers for a smoky flavor or use canned jalapeños for a little heat. Adjust to your spice preference!

  1. Can I make this vegetarian?

Yes! Swap out the chicken for black beans, pinto beans, or sautéed vegetables. The sauce and seasonings work great with these alternatives!

  1. How do I keep the burritos crispy?

Bake them until golden brown before adding the sauce. If you’re meal prepping, store the sauce separately and pour it over the burritos just before serving to keep them crispy!

Now you’re all set to make restaurant-quality burritos at home—without the hassle! 

Creamy Poblano Chicken Enchiladas: Flavor That’ll Knock Your Socks Off!

If you’re craving a meal that’s both indulgent and fresh,
these creamy poblano chicken enchiladas are about to become your new go-to.

With a rich, smoky poblano sauce that’s loaded with flavor,
tender rotisserie chicken, and a gooey layer of melted cheese, each bite is a dream come true.

The best part? It’s all ready in just 35 minutes,
making it a quick dinner you’ll make again and again.

Trust me, this one’s a game changer!

For the Creamy Poblano Sauce:

  • Unsalted Butter – Used to sauté the garlic and poblano peppers, adding richness to the sauce.
  • Garlic – Provides a fragrant base of flavor.
  • Poblano Peppers – These mild, smoky peppers are the star of the sauce, adding depth and flavor.
  • All-Purpose Flour – Thickens the sauce and creates a creamy texture.
  • Chicken Broth – Adds savory flavor and helps form the base of the sauce.
  • Whole Milk – Makes the sauce rich and creamy.
  • Chopped Cilantro – Adds freshness and balances out the richness of the sauce.
  • Kosher Salt – Enhances the overall flavor and seasoning of the sauce.

For the Enchiladas:

  • Shredded Rotisserie Chicken – A time-saver that provides juicy, flavorful chicken for the enchiladas.
  • Corn Tortillas – These soft tortillas are perfect for rolling the enchiladas.
  • Shredded Pepper Jack Cheese – Melts beautifully on top of the enchiladas and adds a creamy, slightly spicy flavor.
  • Lime Juice – Adds a tangy brightness just before serving.
  • Chopped Cilantro (for garnish) – A final touch of freshness to sprinkle on top.

Creamy Poblano Chicken Enchiladas

Prep Time 15 minutes
Cook Time 20 minutes
Total Time 35 minutes
Servings 12 enchiladas
Calories 789
These creamy poblano chicken enchiladas are a flavorful and satisfying dish that’s sure to become a weeknight favorite. Tender shredded chicken is rolled in soft corn tortillas, smothered in a smoky poblano sauce, and topped with melted pepper jack cheese.

Ingredients

  • 3 tbsp unsalted butter, divided
  • 3 cloves garlic, peeled and smashed
  • 2 poblano peppers, seeds and stems removed, chopped
  • ¼ cup all-purpose flour
  • cups chicken broth
  • cups whole milk
  • ½ cup chopped cilantro
  • 1 tsp  kosher salt
  • 4 cups shredded rotisserie chicken
  • 12 corn tortillas, warmed (see note)
  • 8 ounces shredded pepper jack chees
  • Juice of 1/2 lime
  • 1 tbsp chopped cilantro, for garnish

Instructions 

  • Prepare the Sauce: In a large skillet, melt 1 tablespoon of butter over medium heat. Add the garlic and chopped poblanos, cooking until soft, about 10 minutes.
  • Add the remaining 2 tablespoons of butter to the pan, and once melted, sprinkle the flour over the garlic and peppers. Stir for a minute to cook the flour into a paste.
  • Gradually pour in the chicken broth, stirring until the flour dissolves completely. Puree the mixture with an immersion blender until smooth (alternatively, use a food processor or blender).
  • Bring the sauce to a simmer. Stir in the milk and maintain a low simmer, stirring occasionally, until the sauce thickens. It’s ready when you can swipe a spatula across the bottom of the pan and see the pan for a moment before the sauce covers it again.
  • Stir in the chopped cilantro and salt, then remove from heat.
  • Assemble the Enchiladas: Preheat the oven to 375°F. Lightly coat the bottom of a 9x13-inch baking dish with some of the poblano sauce.
  • Place a spoonful of shredded chicken onto each tortilla, then roll them up and arrange them in the prepared baking dish. Repeat for the remaining tortillas.
  • Pour the remaining poblano sauce over the enchiladas, then top with the shredded pepper jack cheese.
  • Bake: Place the dish in the oven and bake for 15-20 minutes, or until the cheese is melted and bubbly.
  • Serve: Squeeze lime juice over the enchiladas, then garnish with cilantro. Serve hot!

Notes

  • Extra Sauce: For a more saucy enchilada experience, feel free to double the sauce recipe.
  • Warming Tortillas: To warm tortillas, spread them on a baking sheet and heat in a 200°F oven for 10 minutes.
  • Blending the Sauce: Use an immersion blender for smooth blending directly in the pan, or transfer the sauce to a blender, ensuring to vent the heat as you blend.
  • Number of Servings: 12 enchiladas (serving size typically around 3 enchiladas per person)
Calories: 789kcal
Course: Dinner
Cuisine: Mexican
Keyword: Poblano Chicken Enchiladas

1. Can I use store-bought rotisserie chicken to make this recipe faster?

Yes! Using rotisserie chicken is a fantastic shortcut. It’s already cooked, just shred it and you’re good to go. It makes this dish super quick and easy!

2. Can I skip roasting the poblano peppers?

While roasting the peppers gives the sauce a richer, smokier flavor, you can definitely skip it if you’re short on time. Just chop them and sauté with the garlic for a faster version.

3. What’s the best way to warm up the tortillas so they don’t break?

To warm your tortillas and keep them soft, wrap them in a damp paper towel and microwave for 30 seconds. This makes them nice and pliable, so they won’t tear when you roll them.

4. Can I make the sauce and chicken ahead of time?

Absolutely! You can make the sauce and shred the chicken ahead of time. Just store them separately in the fridge, and when you’re ready to assemble, simply reheat and proceed with the recipe.

5. What can I use if I don’t have pepper jack cheese?

No problem! Monterey Jack or cheddar cheese work just as well. They’ll melt beautifully and still add that gooey, cheesy goodness to your enchiladas.

Better-Than-Takeout Thai Yellow Chicken Curry! 

If you love rich, creamy curries but think they take hours to make—think again!

This Thai Yellow Chicken Curry is a one-pot wonder loaded with tender chicken, golden potatoes, and a velvety coconut sauce that’s packed with bold, comforting flavors.

The best part? It’s quick, easy, and customizable—perfect for busy weeknights or meal prep!

Serve it over fluffy jasmine rice, and you’ve got a restaurant-worthy meal in just 40 minutes!

Warning: This might just become your new go-to curry. 

For Thai Yellow Chicken Curry

  • Chicken – Use boneless, skinless chicken breasts, cut into bite-sized pieces. You can also substitute with chicken thighs for a juicier texture.
  • Yellow Curry Paste – This is the heart of the dish! A good quality store-bought paste (like Maesri) works great, or you can use homemade for extra depth of flavor.
  • Coconut Cream or Coconut Milk – Gives the curry its signature richness and creaminess. Coconut cream is thicker, while coconut milk is slightly lighter.
  • Baby Yukon Gold Potatoes – These small golden potatoes add a hearty, buttery texture. Cut them into halves or bite-sized pieces.
  • Onion – Thinly sliced yellow onion adds sweetness and enhances the flavor of the curry.
  • Fish Sauce (Optional) – Adds umami depth and authentic Thai flavor.
  • Brown Sugar (Optional) – A little sweetness balances out the spices in the curry.
  • Salt – A pinch to bring all the flavors together.
  • Vegetable Oil – Used to sauté the onions and curry paste.
  • Water or Broth – Helps adjust the consistency of the sauce to your liking.

For Serving

  • Jasmine Rice – The perfect base to soak up the creamy curry sauce.
  • Fresh Cilantro – A sprinkle of chopped cilantro adds a burst of freshness.

Thai Yellow Chicken Curry with Potatoes

Prep Time 15 minutes
Cook Time 25 minutes
Total Time 19 minutes
Servings 6
A rich and flavorful Thai-inspired yellow curry made with tender chicken, golden potatoes, onions, and a creamy coconut curry sauce. Perfect for a cozy dinner!

Ingredients

For the Curry:

  • 1 tbsp avocado oil
  • ½ yellow onion, thinly sliced
  • 1 pound boneless, skinless chicken breasts, cut into bite-sized pieces
  • ¼ cup yellow curry paste (see notes for store-bought options)
  • 10  baby Yukon gold potatoes, halved or cut into bite-sized pieces
  • 1 can (14-ounce) can unsweetened coconut cream or coconut milk
  • ½-1 cup water or broth (adjust for desired consistency)
  • A generous pinch of salt
  • 2 tsp fish sauce (optional)
  • 1-2 tbsp brown sugar (optional)

For Serving:

  • ¼ cup chopped cilantro
  • 2 cups uncooked jasmine rice

Instructions 

Sauté Aromatics & Chicken:

  • Heat the oil in a large pot over medium-low heat. Add the onions and cook until softened and fragrant. Add the chicken and curry paste, stirring to coat. Sauté for 3-5 minutes.

Simmer the Curry:

  • Add the potatoes, coconut cream, and ½ cup water or broth. Season with salt and stir to combine. Let it simmer for 20-30 minutes, or until the potatoes are tender. Add more liquid as needed to reach your desired sauce consistency.

Enhance the Flavor:

  • Stir in the fish sauce and brown sugar to balance the flavors. Taste and adjust as needed.

Serve & Enjoy:

  •  Serve hot over jasmine rice, garnished with fresh cilantro.

Notes

  • Curry Paste: If using store-bought yellow curry paste, such as Maesri, start with 2-3 tablespoons instead of ¼ cup.
  • Coconut Cream vs. Coconut Milk: Coconut cream is thicker and richer than coconut milk, but either works in this recipe.
  • Thicker Sauce: For a thicker consistency, mix 1 tablespoon cornstarch with 1 tablespoon cold water and stir into the simmering curry.
  • Cooking Rice: Follow package instructions for perfectly fluffy jasmine rice.
Course: Main Course
Cuisine: Thai-Inspired
Keyword: Thai Yellow Chicken Curry

1. Can I adjust the spice level?

Of course! If you’re not into heat, just dial down the chili in your curry paste. You can even opt for a mild paste or reduce the amount. Start small, taste, and adjust until it’s perfect for you! 

2. Can I use coconut milk instead of coconut cream?

You absolutely can! Coconut milk is a bit lighter, but it’ll still give you that luscious, creamy curry base. Just keep an eye on the consistency—add a little extra water or broth if it’s a bit thinner than you’d like. 

3. Can I swap the chicken for something else?

Yes, absolutely! This curry is super versatile. Try it with shrimp, beef, tofu, or even chickpeas for a vegetarian twist. Just make sure to adjust the cooking times for different proteins. 

4. How do I make the sauce thicker?

If the sauce is a little too thin, simply stir in a cornstarch slurry (1 tbsp cornstarch mixed with 1 tbsp cold water). Pop it into the curry while it’s simmering, and it’ll thicken right up! 

5. Can I prep the curry paste ahead of time?

Totally! In fact, making the paste in advance is a great idea. You can store it in the fridge for up to a week or freeze it for future curry nights. It’ll save you time when you’re ready to cook! 

Better-Than-Takeout Cashew Chicken

Craving that crispy, sticky, sweet, and savory cashew chicken from your favorite takeout spot?

This recipe delivers golden-crisp chicken, a rich umami-packed sauce, and crunchy cashews in just 30 minutes—faster than delivery and way more delicious.

Made with simple pantry staples, this dish is the ultimate weeknight dinner hero.

Pair it with steamed rice and broccoli for a meal that’ll have everyone asking for seconds.

Why order takeout when you can make something better at home?

Let’s get cooking! 

For Cashew Chicken

  • Chicken – Use boneless, skinless chicken breasts cut into bite-sized pieces. Perfect for a crispy texture that holds the sauce well.
  • Flour & Cornstarch – A combination of these gives the chicken a light, crispy coating when fried.
  • Salt & Paprika – Adds seasoning and a touch of warmth to the batter.
  • Cold Water – Helps create a smooth batter for coating the chicken.
  • Vegetable Oil – Used for frying to achieve that golden, crunchy texture.
  • Cashew Halves – Brings a buttery crunch and nutty flavor to the dish.

For Cashew Chicken Sauce

  • Hoisin Sauce – The base of the sauce, adding rich, slightly sweet umami flavor.
  • Soy Sauce – Enhances the saltiness and depth of the sauce. Low sodium works best to control the salt level.
  • White Vinegar – Adds acidity to balance out the sweetness and richness.
  • Sriracha (Optional) – Gives the sauce a slight kick of heat for extra depth.
  • Granulated Sugar – Adds sweetness to balance the savory elements.
  • Garlic & Ginger – The key aromatics that bring bold, fragrant flavor.

Cashew Chicken

Prep Time 15 minutes
Cook Time 15 minutes
Total Time 30 minutes
Servings 6
Crispy, saucy, and packed with flavor—this homemade Cashew Chicken rivals your favorite takeout! Serve it with steamed rice and broccoli for a complete meal.

Ingredients

For the Chicken:

  • ¾ cup flour¾
  • ¾ cup cornstarch
  • 1 tsp salt
  • ½ tsp paprika
  • ¾ cup cold water
  • ½ cup vegetable oil (for frying)
  • 1 lb  boneless, skinless chicken breasts, cut into bite-sized pieces
  • 1 cup cashew halves

For the Sauce:

  • ½ cup hoisin sauce
  • ¼ cup soy sauce
  • 2 tbsp white vinegar
  • 1 tbsp sriracha (optional)
  • ¼ cup granulated sugar
  • 2 cloves garlic, grated
  • 1 small piece fresh ginger, grated

Instructions 

Prepare the Batter:

  • In a bowl, mix the flour, cornstarch, salt, and paprika.
  • Set aside half of this mixture in a separate bowl.
  • To the remaining half, add the cold water and whisk into a smooth batter.

Make the Sauce:

  • Whisk together hoisin sauce, soy sauce, vinegar, sriracha, sugar, garlic, and ginger. Set aside.

Fry the Chicken:

  • Heat oil in a pan over medium heat until a drop of water sizzles.
  • Dredge chicken pieces in the dry flour mixture, then coat in the batter, letting excess drip off.
  • Fry for 2-3 minutes per side until golden. Drain on paper towels and remove excess oil from the pan.

Combine and Finish:

  • Return the chicken to the pan. Add sauce and cashews, stirring for about 1 minute until coated and fragrant.
  • For extra caramelization and stickiness, cook for up to 5 minutes.

Serve:

  • Enjoy hot with rice and steamed or roasted broccoli.

Notes

  • Shortcut for Frying: Instead of coating and frying individual pieces, toss all the chicken in the dry mix, then mix with the batter. Fry in two batches, using forks to separate pieces.
  • Pan Choice: A nonstick pan helps prevent sticking.
  • Leftovers: Reheat in a skillet for a crispier texture.
Course: Dinner
Cuisine: Chinese-Inspired
Keyword: Cashew Chicken

1. Can I use chicken thighs instead of breasts?

Yes, you can! Chicken thighs are packed with flavor and stay juicier, so they make a great substitute. Just adjust the cooking time slightly, and you’re good to go!

2. Is there a way to skip deep frying?

Absolutely! Stir-fry the chicken instead of deep frying it. Skip the battering step, cook the chicken in a hot pan until golden, then toss in the sauce and cashews. It’s a quicker, lighter version!

3. How can I make this gluten-free?

Easy! Swap the soy sauce for tamari (or coconut aminos) and check that your hoisin sauce is gluten-free. That’s all it takes to make this dish gluten-friendly while keeping all the deliciousness!

4. Can I add some veggies to this dish?

Of course! Toss in some bell peppers, broccoli, snap peas, or carrots. Not only do they add color and crunch, but they’ll make the dish even more filling.

5. Can I prep anything in advance?

You bet! You can chop the chicken and veggies ahead of time and store them in the fridge. You can even mix the sauce up and keep it ready for when you’re ready to cook. This will make dinner even quicker when it’s time to get cooking!

Creamy Sun-Dried Tomato Chicken

If you love restaurant-style creamy chicken dishes but don’t want the hassle, this Creamy Sun-Dried Tomato Chicken is your answer!

Perfectly seared chicken smothered in a velvety garlic-Parmesan sauce packed with deep, tangy sun-dried tomato flavor—it’s the kind of sauce you’ll want to drink straight from the pan!

Bonus? It’s made with simple pantry staples and is so easy to throw together on busy weeknights.

Serve it over pasta, mashed potatoes, or with crusty bread to soak up every last drop.

Once you try it, you’ll want to make it again and again!

For the Chicken

  • Chicken – Use boneless, skinless chicken thighs or breasts. Thighs are juicier, while breasts cook faster and leaner.
  • Salt & Black Pepper – Simple seasoning to enhance the chicken’s flavor.
  • Sun-Dried Tomato Oil – Adds extra richness and enhances the sun-dried tomato flavor.
  • Garlic – A must-have for depth of flavor.
  • Chicken Broth – Adds a touch of depth.

For the Creamy Sauce

  • Sun-Dried Tomatoes – Packed with a tangy, slightly sweet flavor that makes the sauce irresistible.
  • Chicken Broth – Adds umami and keeps the sauce from being overly thick.
  • Heavy Cream – Creates a luscious, creamy texture.
  • Parmesan Cheese – Melts into the sauce for a rich, cheesy finish.
  • Dijon Mustard – Enhances the sauce with a subtle tang and slight thickening effect.
  • Fresh Basil – Adds a pop of freshness (optional but recommended).

Creamy Sun-Dried Tomato Chicken

Prep Time 10 minutes
Cook Time 10 minutes
Total Time 20 minutes
Servings 5
Calories 530
Indulge in tender chicken coated in a creamy, tangy sun-dried tomato sauce that’s packed with flavor. Ready in just 20 minutes, it’s the perfect easy dinner for any night!

Ingredients

For the Chicken:

  • 1.5 lb (750g) boneless, skinless chicken thighs or breasts.
  • ½ tsp salt
  • Black pepper, to taste
  • 2tbsp oil (from the sun-dried tomato jar)

For the Sauce:

  • ½ cup sun-dried tomatoes, drained and sliced
  • 2  garlic cloves, minced
  • ½ cup (125 ml) chicken broth
  • ¾ cup (185 ml) low-sodium chicken broth
  • ¾ cup (185 ml) heavy cream
  • cup (30g) finely grated Parmesan cheese
  • 2 tsp Dijon mustard (optional)
  • 1 cup fresh basil leaves (optional)

Instructions 

Prepare the Chicken:

  • If using chicken breasts, slice them in half horizontally to create thinner cutlets.
  • Season both sides with salt and black pepper.

Sear the Chicken:

  • Heat the sun-dried tomato oil in a large skillet over high heat.
  • Add the chicken and sear for about 6 minutes total for thighs or 4 minutes per side for breasts, until golden brown.
  • Remove from the skillet and set aside.

Make the Sauce:

  • In the same skillet, add the minced garlic and sauté for 15 seconds, just until fragrant.
  • Pour in chicken broth and scrape up any browned bits from the bottom of the pan. Let it simmer for about 1 minute.
  • Stir in the Dijon mustard, chicken broth, heavy cream, Parmesan, and sun-dried tomatoes.
  • Simmer for 2-3 minutes, stirring occasionally, until the sauce thickens.

Finish & Serve:

  • Taste the sauce and adjust seasoning with salt and pepper if needed.
  • Stir in the fresh basil leaves (if using), then return the chicken to the pan.
  • Spoon the sauce over the chicken and let it simmer for 1 minute to heat through.
  • Serve immediately with mashed potatoes, pasta, or crusty bread to soak up the sauce!

Notes

  • Sun-Dried Tomatoes: Use oil-packed sun-dried tomatoes for the best flavor. The oil adds extra richness when cooking.
  • Parmesan: Use freshly grated or finely shredded Parmesan for smooth melting. Avoid pre-grated "sand-like" Parmesan as it doesn’t melt well.
  • Mustard: Optional but adds a slight tang and helps thicken the sauce.
Calories: 530kcal
Course: Dinner, Main Course
Cuisine: Western
Keyword: Sun-Dried Tomato Chicken

1. Can I use fresh tomatoes instead of sun-dried tomatoes?

Sun-dried tomatoes add a deep, tangy sweetness that fresh ones don’t quite match. If you’re using fresh tomatoes, try roasting them first to bring out their natural sweetness.

2. What’s the best side to serve with this dish?

This chicken pairs beautifully with pasta, mashed potatoes, or rice. Want something lighter? A crisp garden salad or roasted veggies make a great side!

3. Can I make this without dairy?

Absolutely! Swap the heavy cream for coconut cream or a dairy-free alternative. Just note that coconut cream adds a subtle coconut flavor to the sauce.

4. How do I store and reheat leftovers?

Keep leftovers in an airtight container in the fridge for up to 3 days. Reheat on the stovetop over low heat, adding a splash of broth if the sauce thickens too much.

5. Can I use bone-in chicken?

Yes! Bone-in chicken works well but will take longer to cook. Just be sure to sear it properly and simmer until fully cooked through.

Grilled Chicken Caprese – Big Flavor, Easy Prep!

If you love fresh, bold flavors with minimal effort, this Grilled Chicken Caprese is your new weeknight hero!

Juicy, marinated chicken is grilled to perfection, then topped with creamy buffalo mozzarella, sweet grilled tomatoes, and fragrant basil.

A drizzle of balsamic glaze ties it all together for a restaurant-quality meal in just 25 minutes.

Whether you’re looking for a low-carb dinner or a crowd-pleasing summer dish, this recipe delivers fast prep and big flavors—with ingredients you probably already have.

Let’s fire up that grill! 

For Grilled Chicken Caprese

  • Chicken Breasts – Skinless and boneless, perfect for soaking up the marinade and grilling beautifully.
  • Olive Oil – Adds richness and helps the chicken stay juicy while grilling.
  • Balsamic Vinegar – Gives the chicken a tangy, slightly sweet depth of flavor.
  • Garlic – A key ingredient that brings bold, aromatic flavor.
  • Dried Oregano & Basil – Classic Italian herbs that enhance the taste of the marinade.
  • Salt & Black Pepper – Essential for seasoning and bringing out the flavors.
  • Roma Tomatoes – Grilled slices add a fresh, slightly smoky sweetness.
  • Buffalo Mozzarella – Creamy and soft, it melts beautifully over the warm chicken.
  • Fresh Basil – Brings a burst of freshness and a signature Caprese touch.
  • Balsamic Glaze – Drizzled on top for an extra layer of sweet and tangy flavor.

Grilled Chicken Caprese with Buffalo Mozzarella

Prep Time 10 minutes
Cook Time 15 minutes
Total Time 25 minutes
Servings 4
Calories 430
A delicious, low-carb meal featuring juicy grilled chicken, creamy buffalo mozzarella, and fresh basil—perfect for lunch or dinner!

Ingredients

  • 2 tbsp olive oil
  • 2 tbsp  balsamic vinegar
  • 1 tbsp minced garlic
  • 1 tsp dried basil
  • 1 tsp salt
  • 1 pinch cracked black pepper (to taste)
  • 4 boneless, skinless chicken breasts
  • 1 Roma tomato, sliced
  • 4 slices buffalo mozzarella
  • 4 tbsp fresh basil, shredded
  • 2 tbsp balsamic glaze or reduction (store-bought or homemade)

Instructions 

Marinate the Chicken:

  • In a large shallow bowl, whisk together the olive oil, balsamic vinegar, garlic, oregano, basil, salt, and black pepper. Add the chicken breasts and coat well. Let marinate for at least 30 minutes (if time allows).

Grill the Chicken & Tomatoes:

  •  Preheat the grill to medium heat. Cook the chicken for 5-6 minutes per side, or until fully cooked and slightly charred. While grilling the chicken, place tomato slices on the grill and cook for 1-2 minutes per side.

Assemble the Caprese Chicken:

  • Once the chicken is done, top each breast with a slice of buffalo mozzarella and a grilled tomato slice. Let the residual heat melt the cheese slightly.

Garnish & Serve:

  • Sprinkle shredded basil over the top and drizzle with balsamic glaze. Serve immediately and enjoy!
Calories: 430kcal
Course: Main Course
Cuisine: Italian-inspired
Keyword: Chicken Caprese with Buffalo Mozzarella

Can I bake it instead of frying?

Absolutely! If you prefer a healthier option, bake at 400°F (200°C) for 15-20 minutes until golden and cooked through. Lightly spray or brush with oil before baking for extra crispiness.

How do I keep the breading from falling off?

Make sure to:

  • Pat the chicken dry before breading.
  • Follow the flour → egg → Parmesan-panko order.
  • Press the coating firmly and let the breaded chicken rest for a few minutes before cooking.

Can I prep this ahead of time?

Yes! Bread the chicken and store it in the fridge for up to 4 hours before cooking. This helps the coating stick even better!

What sides go well with this?

So many options! Try:

  • Mashed potatoes or roasted potatoes for a comforting meal.
  • Steamed or roasted veggies for a balanced plate.
  • Pasta or a fresh salad for a lighter touch.

How do I store and reheat leftovers?

  • Store in an airtight container in the fridge for up to 3 days.
  • Reheat in a 375°F (190°C) oven for 10 minutes to keep it crispy. Avoid microwaving—it makes the crust soggy!

 Pro tip: Leftovers make an amazing chicken sandwich or wrap!

Parmesan Crusted Chicken

Golden, crispy, and loaded with flavor—this Parmesan Crusted Chicken is the perfect quick-fix meal that feels fancy but takes minimal effort!

With a crunchy Parmesan and panko coating, every bite is packed with bold, cheesy goodness.

It looks and tastes like a restaurant dish, but you can whip it up in 25 minutes with simple pantry staples.

Serve it with a side of pasta, salad, or roasted veggies, and watch it disappear from plates!

Easy, foolproof, and downright delicious—this is a chicken recipe you’ll want to make on repeat.

For Parmesan Crusted Chicken

  • Chicken – Boneless, skinless chicken breasts, halved horizontally for even cooking.
  • Flour – Helps create a light coating for the chicken before breading.
  • Eggs – Acts as a binding agent to help the breading stick.
  • Parmesan Cheese – Finely shredded for a rich, cheesy flavor in every bite.
  • Panko Breadcrumbs – Adds extra crispiness to the crust.
  • Garlic Powder – Enhances the overall flavor with a subtle garlicky kick.
  • Italian Seasoning – A blend of herbs that gives the chicken a delicious, aromatic taste.
  • Vegetable Oil – For frying, ensuring a crispy and golden brown crust.

Parmesan Crusted Chicken

Prep Time 5 minutes
Cook Time 20 minutes
Total Time 25 minutes
Servings 4
Calories 417
This crispy, golden-brown Parmesan Crusted Chicken is packed with flavor from a perfectly seasoned panko breading. A simple yet delicious dish ready in just 25 minutes!

Ingredients

  • 2  boneless, skinless chicken breasts (halved horizontally)
  • Salt and pepper, to taste
  • cup all-purpose flour
  • 2 eggs, beaten
  • 1 cup  finely shredded Parmesan cheese
  • 1 tsp panko breadcrumbs
  • 1 tsp garlic powder
  • 1 tsp Italian seasoning
  • 4 tbsp vegetable oil

Instructions 

Flatten the Chicken:

  • Place each chicken breast half between parchment paper or plastic wrap.
  • Use a mallet or rolling pin to pound until about ¼ inch thick.
  • Season both sides with salt and pepper; set aside.

Prepare the Breading:

  • Bowl 3: Mix Parmesan, panko, garlic powder, and Italian seasoning.In three shallow bowls:
    Bowl 1: Add flour.
    Bowl 2: Beat eggs.
    Bowl 3: Mix Parmesan, panko, garlic powder, and Italian seasoning.

Coat the Chicken:

  • Press into the Parmesan-panko mixture, ensuring a firm coating.Lightly dredge each piece in flour, shaking off excess.
  • Dip into egg, ensuring an even coat.
  • Press into the Parmesan-panko mixture, ensuring a firm coating

Cook the Chicken:

  • Repeat with remaining chicken, adding 2 more tablespoons of oil as needed.Heat 2 tablespoons of oil in a skillet over medium heat.
  • Cook two pieces at a time for 3-4 minutes per side or until golden brown and the internal temperature reaches 165°F.
  • Place cooked pieces in a 200°F oven to keep warm.
  • Repeat with remaining chicken, adding 2 more tablespoons of oil as needed.

Serve:

  • Remove from the oven and garnish with chopped parsley and lemon wedges, if desired.

Notes

  • Check the FAQ section for substitutions and additional tips.
  • Serve with roasted vegetables, mashed potatoes, or a fresh salad for a complete meal.
Calories: 417kcal
Course: Dinner, Main Course
Cuisine: American
Keyword: Parmesan Crusted Chicken

Can I bake it instead of frying?

Absolutely! If you prefer a healthier option, bake at 400°F (200°C) for 15-20 minutes until golden and cooked through. Lightly spray or brush with oil before baking for extra crispiness.

How do I keep the breading from falling off?

Make sure to:

  • Pat the chicken dry before breading.
  • Follow the flour → egg → Parmesan-panko order.
  • Press the coating firmly and let the breaded chicken rest for a few minutes before cooking.

Can I prep this ahead of time?

Yes! Bread the chicken and store it in the fridge for up to 4 hours before cooking. This helps the coating stick even better!

What sides go well with this?

So many options! Try:

  • Mashed potatoes or roasted potatoes for a comforting meal.
  • Steamed or roasted veggies for a balanced plate.
  • Pasta or a fresh salad for a lighter touch.

How do I store and reheat leftovers?

  • Store in an airtight container in the fridge for up to 3 days.
  • Reheat in a 375°F (190°C) oven for 10 minutes to keep it crispy. Avoid microwaving—it makes the crust soggy!

   Pro tip: Leftovers make an amazing chicken sandwich or wrap!

Caprese Chicken – A 30-Minute Skillet Wonder!

Craving a fast, fresh, and flavor-packed dinner?

This Caprese Chicken is everything you love about a classic Caprese salad—melty mozzarella, juicy tomatoes, fragrant basil—but with a hearty, protein-packed twist!

Seared to perfection and baked in a basil pesto blanket, this one-pan meal comes together in just 30 minutes.

It’s weeknight-friendly, minimal on prep, and big on bold Italian flavors.

Plus, with a drizzle of balsamic glaze to finish it off, every bite is a delicious balance of savory, creamy, and tangy goodness.

Simple ingredients. One skillet. Epic flavor.

This is the quick, satisfying dinner you’ll be making on repeat! 

For Caprese Chicken

  • Chicken Breasts – Boneless and skinless, sliced in half for even cooking.
  • Kosher Salt & Black Pepper – Enhances the natural flavors of the chicken.
  • Olive Oil & Butter – A mix of both creates a rich and golden sear.
  • Basil Pesto – Adds bold, herby flavor to every bite.
  • Fresh Mozzarella – Melts beautifully over the chicken for creamy goodness.
  • Cherry or Cocktail Tomatoes – Brings a juicy, fresh contrast to the dish.
  • Balsamic Glaze – Adds a tangy-sweet drizzle to finish.
  • Fresh Basil – Slivered for an extra pop of freshness.

Easy Caprese Chicken (30-Minute Skillet Meal)

Prep Time 10 minutes
Cook Time 20 minutes
Total Time 30 minutes
Servings 4
Calories 233
A quick and flavorful Italian-inspired dish featuring juicy chicken, fresh mozzarella, cherry tomatoes, and basil pesto—all ready in just 30 minutes!

Ingredients

  • 2  boneless, skinless chicken breasts
  • Kosher salt & freshly ground black pepper (to taste)
  • 1 tbsp extra virgin olive oil
  • 1 tbsp  butter
  • 1 jar (6 oz.) basil pesto
  • 4-6 slices fresh mozzarella (or 6 oz. shredded mozzarella)
  • 8 small cocktail tomatoes, sliced
  • Balsamic glaze (for drizzling)
  • Fresh basil, slivered

Instructions 

  • Preheat & Prep: Preheat your oven to 400°F. Using a sharp knife, slice each chicken breast in half lengthwise to create thinner cutlets. Season both sides with salt and black pepper.
  • Sear the Chicken: Heat olive oil and butter in a large oven-safe skillet over medium-high heat. Once the butter melts, add the chicken and cook for about 3–4 minutes per side until golden brown.
  • Add Toppings: Spread 1–2 tablespoons of basil pesto over each chicken breast. Top with fresh mozzarella slices and tomato slices.
  • Bake to Perfection: Transfer the skillet to the oven and bake for 10–12 minutes, or until the chicken reaches an internal temperature of 165°F.
  • Garnish & Serve: Remove from the oven and drizzle with balsamic glaze. Sprinkle with fresh basil before serving. Enjoy!
Calories: 233kcal
Course: Main Course
Cuisine: Italian
Keyword: Caprese Chicken

1. Can I use store-bought pesto?

Absolutely! A good-quality store-bought pesto saves time and still delivers amazing flavor. If you have extra, drizzle it over veggies or mix it into pasta!

2. What if I don’t have an oven-proof skillet?

No worries! Just sear the chicken in any pan, then transfer it to a baking dish to finish cooking in the oven. Easy and just as delicious!

3. How do I keep my chicken from drying out?

Slicing the chicken breasts in half makes them cook faster and more evenly. Also, don’t overbake—pull them out as soon as they hit 165°F!

4. What can I use instead of balsamic glaze?

A quick balsamic reduction works wonders! Just simmer balsamic vinegar until thick. If you’re short on time, a drizzle of straight balsamic vinegar works too!

5. Can I make this ahead of time?

Yes! Sear the chicken and store it separately from the toppings. When ready to serve, assemble and bake until everything is melty and perfect.

This recipe is all about big flavors with minimal effort—you’ll be making it on repeat! 

Garlic Butter Mushroom Stuffed Chicken

This Garlic Butter Mushroom Stuffed Chicken is the ultimate weeknight dinner hero—crispy, juicy, and oozing with melty cheese and garlicky mushrooms.

It’s the kind of restaurant-worthy meal you’d order out, but shockingly easy to make at home.

With just a few simple ingredients and a quick bake in the oven, you’ll have a dish that’s fancy enough for guests yet effortless for busy nights.

And if you’re feeling extra indulgent? The creamy Parmesan sauce takes it to another level!

Big flavors, minimal effort—let’s cook! 

For the Mushrooms

  • Butter – Adds rich flavor and helps sauté the mushrooms perfectly.
  • Brown Mushrooms – Earthy and meaty, they soak up the garlic butter beautifully.
  • Garlic – Essential for bold, savory flavor.
  • Fresh Parsley – Brings freshness and a pop of color.
  • Salt & Pepper – Enhances the flavor of the mushrooms.

For the Chicken

  • Chicken Breasts – Boneless, skinless, and perfect for stuffing.
  • Salt & Pepper – Simple seasoning for flavor.
  • Onion Powder – Adds a subtle sweetness and depth.
  • Dried Parsley – Brings extra herbaceous flavor.
  • Mozzarella Cheese – Melts beautifully for that gooey, cheesy goodness.
  • Parmesan Cheese – Adds a salty, nutty depth to the filling.

For the Garlic Parmesan Cream Sauce (Optional)

  • Olive Oil – Helps sauté the garlic and adds richness.
  • Garlic – Infuses the sauce with bold, aromatic flavor.
  • Dijon Mustard – Adds a slight tang and depth to the sauce.
  • Half-and-Half (or Cream) – Creates a creamy, velvety texture.
  • Parmesan Cheese – Melts into the sauce for a deliciously cheesy finish.
  • Salt & Pepper – To season to your taste.
  • Cornstarch (Optional) – Helps thicken the sauce for a richer texture.
  • Fresh Parsley – Adds freshness and color.

Garlic Butter Mushroom Stuffed Chicken with Creamy Parmesan Sauce

Prep Time 10 minutes
Cook Time 30 minutes
Total Time 40 minutes
Servings 4
Calories 6849
A rich and flavorful chicken dish packed with garlicky mushrooms, gooey cheese, and an optional creamy Parmesan sauce. A dream meal for garlic mushroom lovers!

Ingredients

For the Mushrooms:

  • 8 tbsp butter
  • 8 oz brown mushrooms, sliced
  • 4 cloves garlic, minced
  • 2 tbsp fresh parsley, chopped
  • Salt and pepper, to taste

For the Chicken:

  • 4 skinless, boneless chicken breasts
  • Salt and pepper, to taste
  • 1 tsp onion powder
  • 1 tsp dried parsley
  • 8 slices mozzarella cheese
  • ¼ cup fresh Parmesan cheese, grated

For the Creamy Garlic Parmesan Sauce (Optional):

  • 1 tbsp olive oil
  • 2 large garlic cloves, minced
  • 1 tbsp Dijon mustard
  • cup alf-and-half (or substitute with ¾ cup whole milk + ¾ cup reduced-fat cream)
  • ½ cup Parmesan cheese, finely grated
  • Salt and pepper, to taste
  • ½ tsp cornstarch mixed with 2 tsp water (optional, for thickening)
  • 2 tbsp fresh parsley, chopped

Instructions 

1. Prepare the Mushrooms:

  • Preheat the oven to 400°F (200°C).
  • Heat butter in a large oven-safe skillet over medium heat.
  • Add garlic and sauté for about 1 minute until fragrant.
  • Stir in mushrooms, salt, pepper, and parsley. Cook until mushrooms soften.
  • Set aside to cool while you prepare the chicken.

Prepare the Chicken:

  • Pat chicken breasts dry with a paper towel.
  • Season with salt, pepper, onion powder, and dried parsley, rubbing to coat evenly.
  • Slice a pocket into the thickest part of each chicken breast.
  • Stuff each pocket with 2 slices of mozzarella and a portion of the mushroom mixture.
  • Sprinkle 1 tbsp Parmesan cheese on top of the mushrooms in each breast.
  • Secure the opening with 2–3 toothpicks to keep the filling in place.

3. Cook the Chicken:

  • In the same skillet with leftover garlic butter, heat over medium-high heat.
  • Sear the stuffed chicken on both sides until golden brown.
  • Cover the skillet and transfer it to the preheated oven.
  • Bake for 20 minutes or until the chicken is cooked through (internal temp: 165°F/75°C).
  • Remove from the oven and let rest while you prepare the sauce (if making).

4. Make the Cream Sauce (Optional):

  • In the same skillet, heat olive oil over low heat.
  • Add garlic and sauté for 1 minute until fragrant.
  • Stir in Dijon mustard and half-and-half (or cream substitute).
  • Bring to a gentle simmer, then add any remaining mushrooms and Parmesan cheese.
  • Let the sauce cook until the Parmesan melts slightly.
  • (Optional) For a thicker sauce, add the cornstarch mixture and stir quickly to combine.
  • Season with salt and pepper, then stir in fresh parsley.
  • Return the chicken to the pan and coat with the sauce before serving.

5. Serve & Enjoy:

  • Half-and-half substitute: If you don’t have half-and-half, use ¾ cup whole milk + ¾ cup reduced-fat cream.
  • Make it low-carb: Serve with zucchini noodles, cauliflower rice, or a simple green salad.

Notes

  • Half-and-half substitute: If you don’t have half-and-half, use ¾ cup whole milk + ¾ cup reduced-fat cream.
  • Make it low-carb: Serve with zucchini noodles, cauliflower rice, or a simple green salad.
Calories: 6849kcal
Course: Main Course
Cuisine: American, Italian-inspired
Keyword: Garlic Butter Mushroom Stuffed Chicken

1. Can I prep the chicken ahead of time?

Yes! You can assemble the stuffed chicken up to 24 hours before cooking. Just store it in the fridge, and let it come to room temperature before baking for even cooking. Easy peasy!

2. Can I use other types of cheese for stuffing?

Absolutely! Mozzarella is a great meltable choice, but you could swap it with Swiss, cheddar, or even a mix of cheeses for a twist. Just make sure the cheese melts well!

3. What if I don’t have an oven-safe skillet?

No problem! You can still make this by searing the chicken in any skillet, then transfer it to a baking dish for the oven. Use the same pan to make the sauce afterward.

4. How do I know if the chicken is fully cooked?

For perfect results, use a meat thermometer. The chicken should reach an internal temperature of 165°F (74°C). No more guesswork!

5. Can I make this recipe without the cream sauce?

Of course! If you want to skip the cream sauce, the stuffed chicken alone is still delicious and juicy. For an even simpler version, drizzle it with olive oil and some herbs.

Lasagna… Without the Pasta?!

Who says you need noodles to enjoy lasagna?

This Lasagna Stuffed Chicken is a game-changer—juicy chicken breasts packed with a creamy ricotta filling, smothered in marinara, and topped with melty cheese.

It’s low-carb, high-protein, and ridiculously delicious.

Whether you’re cutting carbs or just looking for a new dinner favorite, this dish brings all the best parts of lasagna—minus the heavy pasta.

One bite, and you’ll be hooked! 

For the Chicken

  • Chicken Breasts – Boneless, skinless, and perfect for stuffing with all the cheesy goodness.
  • Marinara Sauce – Adds a rich, classic lasagna flavor.
  • Italian Seasoning – A blend of herbs to enhance the taste.
  • Olive Oil – Helps keep the chicken juicy while baking.
  • Salt & Pepper – Simple seasonings to bring out all the flavors.

For the Ricotta Filling

  • Ricotta Cheese – The creamy base of the stuffing.
  • Mozzarella Cheese – Gives that gooey, melty texture we love.
  • Parmesan Cheese – Adds a nutty, salty depth of flavor.
  • Egg – Helps bind the cheese mixture together.
  • Fresh Basil – Brings a fresh, herby kick to the filling.

For the Topping

  • More Mozzarella – Because extra cheese is always a good idea!
  • More Parmesan – For that final touch of savory richness.
  • Fresh Basil – A garnish that makes it look and taste even better.

Lasagna Stuffed Chicken

Prep Time 10 minutes
Cook Time 50 minutes
Total Time 1 hour
Servings 4
Calories 452
A delicious low-carb twist on classic lasagna, featuring a creamy ricotta filling stuffed inside juicy chicken breasts and topped with marinara and melted cheese.

Ingredients

  • ¾ cup ricotta cheese
  • cups  shredded mozzarella cheese, divided
  • ¼ cup plus 2 tbsp freshly grated Parmesan cheese, divided
  • 1 large egg
  • 2 tbsp fresh basil, chopped (plus extra for garnish)
  • Kosher salt and freshly ground black pepper, to taste
  • 4 boneless, skinless chicken breasts (about 1 ¾ lbs)
  • cup marinara sauce
  • ½ tsp talian seasoning
  • 1 tbsp extra-virgin olive oil

Instructions 

Step 1: Prepare the Filling

  • Preheat oven to 375°F (190°C). In a bowl, mix ricotta, ½ cup mozzarella, ¼ cup Parmesan, egg, and chopped basil. Season with salt and pepper.

Step 2: Stuff the Chicken

  • Cut a pocket into each chicken breast. Spoon 2 tablespoons of marinara sauce and ¼ of the ricotta mixture into each pocket.

Step 3: Arrange and Season

  • Place the stuffed chicken in a 9"x13" baking dish. Season with salt and pepper, sprinkle with Italian seasoning, and drizzle with olive oil.

Step 4: Bake the Chicken

  • Bake for about 25 minutes, or until the internal temperature reaches 155°F (68°C). Larger chicken breasts may take up to 35 minutes. Remove any excess juices from the pan.

Step 5: Add Toppings & Broil

  • Switch oven to broil. Top the chicken with the remaining 1 cup marinara, ¾ cup mozzarella, and 2 tablespoons Parmesan. Broil for 4-5 minutes, until the cheese is golden and bubbly and the chicken reaches 165°F (74°C).

Step 6: Garnish & Serve

  • Sprinkle with additional fresh basil and serve hot.
    Enjoy your lasagna-stuffed chicken!
Calories: 452kcal
Course: Main Course
Cuisine: Italian-inspired
Keyword: Chicken Lasagna

1. Can I prep the chicken ahead of time?

Absolutely! You can stuff the chicken breasts and store them in the fridge for up to 2 days. That way, when it’s time for dinner, all you need to do is pop them in the oven!

2. What if I don’t have fresh basil?

No problem! You can swap fresh basil with dried basil (about 2 teaspoons) or use any other herb you like, such as oregano or thyme. It’ll still taste amazing!

3. Can I use store-bought marinara sauce?

Yes, feel free to use your favorite jarred marinara sauce. It’s a great shortcut that will still give you that classic lasagna flavor without the hassle of homemade sauce.

4. How can I make this dish spicier?

If you like a little heat, you can add red pepper flakes or a pinch of cayenne pepper to the ricotta mixture or sprinkle it on top before baking. It’ll give your dish an extra kick!

5. Can I freeze the stuffed chicken?

Yes, you can! Assemble the chicken and freeze it before baking. Just wrap it tightly in plastic wrap or foil and store it in an airtight container. When you’re ready to cook, let it thaw in the fridge overnight, then bake as usual.