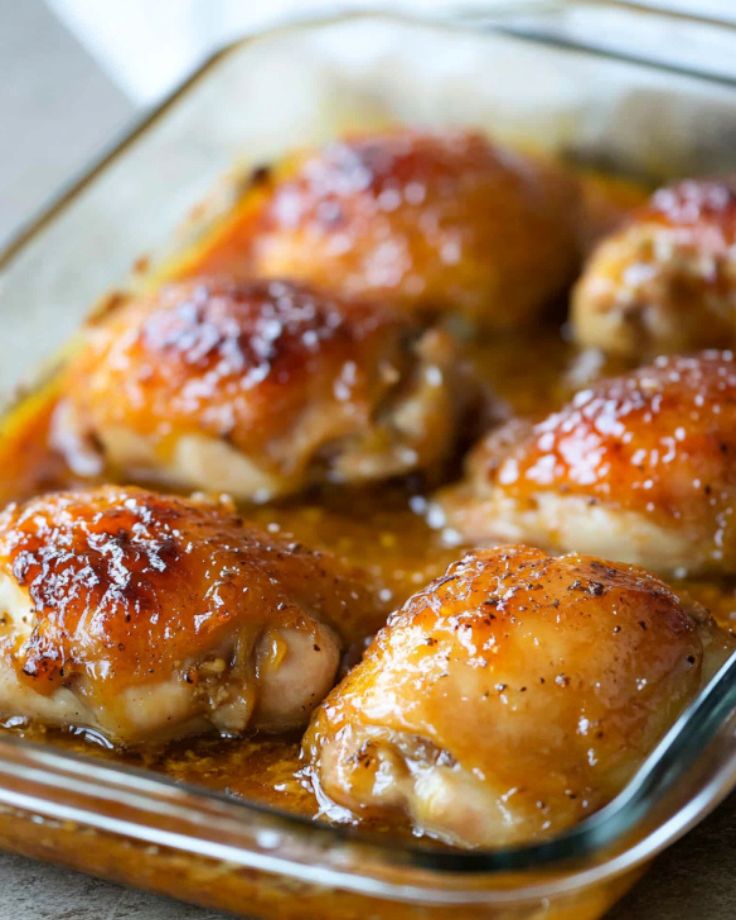
Crispy Baked Chicken Thighs

Craving crispy chicken without the mess of deep frying? These oven-baked chicken thighs
are golden perfection—crispy on the outside, juicy and tender inside.
Using pantry staples you already have, this recipe comes together in minutes
and bakes in one pan (hello, easy clean-up!).
It’s seriously amazing how a simple spice rub can turn everyday chicken thighs
into something worth craving every week!
Trust me, once you try this effortless method,
you’ll wonder why you ever fried chicken in the first place.
For Crispy Baked Chicken Thighs
- Chicken Thighs – Use bone-in, skin-on chicken thighs for the crispiest, juiciest result. You can also go boneless if preferred, just adjust cooking time slightly.
- Olive Oil – Helps crisp up the chicken skin while baking and ensures the seasoning sticks perfectly.
- Garlic Powder and Onion Powder – Essential pantry staples that add savory depth without overpowering the chicken.
- Italian Seasoning – A versatile blend of herbs that adds subtle flavor and fragrance. Perfectly complements the chicken.
- Paprika – Adds beautiful color and a hint of mild smokiness to the chicken thighs.
- Salt and Black Pepper – Simple seasonings that enhance all the flavors. Don’t skip these!

Crispy Oven-Baked Chicken Thighs
Ingredients
- 3 lbs chicken thighs (approximately 6-8 pieces)
- 2 tbsp olive oil
- 2 tsp salt
- 2 tsp garlic powder
- 2 tsp onion powder
- 2 tsp Italian seasoning
- 1 tsp black pepper
- 1 tsp paprika
Instructions
- Preheat your oven to 400°F (200°C). Line a large baking sheet with aluminum foil for easy clean-up, and set aside.
- Remove chicken thighs from the package and pat dry thoroughly using paper towels. Place the thighs onto the prepared baking sheet, then drizzle evenly with olive oil. Rub gently to coat all sides.
- In a small bowl, combine salt, garlic powder, onion powder, Italian seasoning, black pepper, and paprika. Sprinkle this spice mixture evenly over the chicken thighs, coating each piece well.
- Bake the chicken thighs in the preheated oven for approximately 35-45 minutes, or until cooked through. Chicken is ready when the internal temperature reaches 165°F (74°C).
Notes
- Always check that chicken has reached the safe internal temperature of 165°F (74°C) before serving.

1. What’s the best oven temperature for crispy skin?
400°F (200°C) is the magic number! It’s hot enough to render the fat and crisp up the skin without drying out the meat. If you want EXTRA crispy skin, try 425°F (218°C), but keep an eye on it!
2. How long should I bake chicken thighs?
Bone-in, skin-on thighs take 35-45 minutes at 400°F. The exact time depends on their size. The real trick? Use a meat thermometer and make sure the internal temp hits 165°F (74°C).
3. Bone-in or boneless—what’s better?
For max juiciness and flavor, go bone-in, skin-on. The skin crisps up beautifully, and the bone keeps the meat extra tender. Boneless thighs cook faster but won’t be quite as juicy.
4. How do I get the skin super crispy?
Pat the thighs really dry with paper towels before seasoning—moisture is the enemy of crispiness! Also, don’t skip the olive oil; it helps with that golden crunch.
5. Can I marinate the chicken first?
Totally optional! The spice rub alone packs in flavor, but if you want an extra boost, marinate the thighs for a few hours (or overnight) in the fridge. Just pat them dry before baking so the skin still gets crispy!