Fast, Flavorful, and Foolproof Chicken Fajitas!
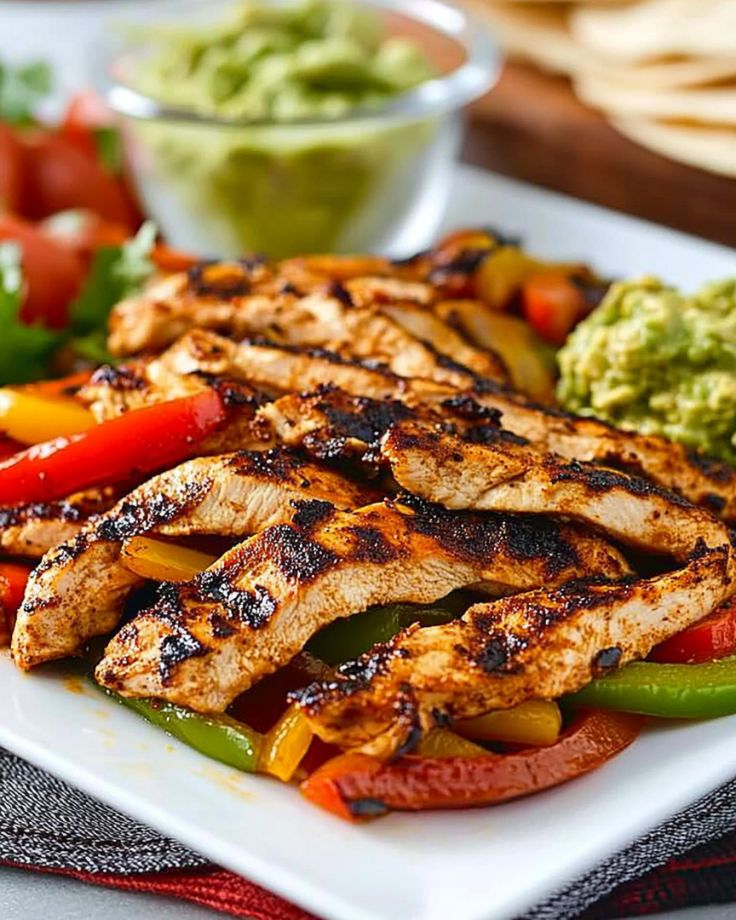
Got 25 minutes? Then you’ve got time to whip up the juiciest, most flavor-packed chicken fajitas ever!
A zesty lime marinade keeps the chicken tender, while a quick sear gives it that irresistible smoky char.
Toss in colorful bell peppers and onions, and you’ve got a sizzling, restaurant-quality meal—without the wait!
Perfect for busy weeknights, meal prep, or fajita night with friends, this recipe delivers big flavors with minimal effort.
Grab your tortillas and get ready for a crowd-pleaser!
For Chicken Fajitas
- Chicken Thighs – Skinless and boneless for maximum juiciness and flavor.
- Lime Juice – Adds a fresh, zesty kick to the marinade.
- Oil – Helps sear the chicken to perfection while keeping it moist.
- Garlic – A bold, aromatic base for the marinade.
- Ground Cumin – Brings a warm, earthy depth to the seasoning.
- Salt – Enhances all the flavors in the dish.
- Ground Chili – Adjust to your spice preference for a little heat.
- Fresh Cilantro – Optional, but adds a fresh herbaceous touch.
- Bell Peppers – A mix of red, yellow, and green for a colorful, sweet crunch.
- Red Onion – Sautéed with the peppers for extra flavor.
- Avocado – Creamy, rich, and the perfect topping for fajitas.
For Serving
- Tortillas – Warmed up for the perfect wrap.
- Chopped Cilantro – A fresh garnish to brighten up the flavors.
- Additional Toppings – Cheese, sour cream, salsa, or anything you love!

Delicious & Easy Chicken Fajitas
Ingredients
For the Marinade:
- 2 tbsp fresh lime juice
- 2 tbsp oil (olive or vegetable)
- 1 large garlic clove, minced
- 1½ tsp ground cumin
- 1 tsp salt
- 1-½ tsp ground chili (adjust to taste)
- 1 tbsp fresh cilantro, chopped (optional)
For the Fajitas:
- 1½ pounds boneless, skinless chicken thighs
- 3 large bell peppers (green, red, and yellow), sliced into strips
- 1 red onion, thinly sliced
- 2 avocados, peeled, seeded, and sliced
Instructions
Marinate the Chicken:
- In a large bowl, whisk together the lime juice, oil, garlic, cumin, salt, chili, and cilantro. Add the chicken thighs and coat evenly. If possible, let marinate for at least 30 minutes for enhanced flavor.
Cook the Chicken:
- Heat a large skillet over medium-high heat until hot. Lightly coat with a drizzle of oil. Sear the chicken on both sides until golden brown and cooked through (about 8 minutes per side, depending on thickness). Flip occasionally for even charring.
- Once cooked, transfer to a plate, cover loosely with foil, and let rest.
Sauté the Vegetables:
- In the same skillet, add the sliced bell peppers and onions. If needed, drizzle with a little extra oil. Sauté until the onions soften and the peppers develop a slight char. Season with salt and pepper to taste.
Assemble & Serve:
- Slice the rested chicken into strips. Serve warm with tortillas, fresh cilantro, sliced avocado, and your favorite toppings.

Serving Suggestions
- Pair with warm flour tortillas or corn tortillas
- Add sour cream, cheese, or salsa for extra flavor
- Serve with rice or black beans for a heartier meal
1. Can I use a different pan if I don’t have a cast iron skillet?
Absolutely! While a cast iron skillet gives the best sear and flavor, a stainless steel or non-stick pan will work just fine. Just make sure it’s hot before adding the chicken!
2. Should I slice the chicken before or after cooking?
For the juiciest fajitas, cook the chicken whole and slice it after resting. But if you’re short on time, slicing it first speeds up the cooking process—just be careful not to overcook!
3. Can I grill the chicken instead of cooking it on the stovetop?
Yes! Grilling adds a smoky, charred flavor that takes fajitas to the next level. Just preheat your grill, cook for 6–8 minutes per side, then slice and serve.
4. How do I store and reheat leftovers?
Store in an airtight container in the fridge for up to 5 days. To reheat, toss everything in a skillet over medium heat until warmed through. Avoid the microwave—it can make the chicken rubbery!
5. What are the best toppings for fajitas?
Keep it classic with avocado, cilantro, and a squeeze of lime. Or go bold with cheese, sour cream, or salsa. Want some heat? Add jalapeños or a drizzle of hot sauce!
Now you’re ready to whip up the best chicken fajitas—fast, easy, and packed with flavor!